
P-82 Twin Mustang RC Build
RC swap meets are some of the best places to go, whether you are looking to get a deal on a new plane for yourself or maybe looking to snag something on the older and more rare side of things. This last January, I attended a local swap meet with some friends of mine when I stumbled across someone who was trying to thin out their extensive collection of old ARF airplanes.
Among the collection sitting on the table were some old Great Planes and Hangar 9 ARFs, which all looked super enticing. However, it was what was slightly hidden underneath the table in an unlabeled box that caught my eye. That, of course, was a P-82 Twin Mustang ARF that was brand new and still sealed in the protective plastic bags. For $150, it was a hard deal to pass up, and it quickly found its way home with me.
Identifying the Kit
Once home and out on the build table, I had to do some research to figure out what exactly I was looking at—and what I had just dropped $150 on. The seller told me that it was a World Models P-82, which, if that were the case, meant I had scored an incredible deal on an old and rare model airplane.
However, I soon realized that was not the case. Instead, it was a replica of the World Models kit from Nitro Planes. Still old, still kind of rare, but not exactly what I was hoping for. Either way, I had a basically brand-new, unique airplane to get to work on.
This plane was released in the mid-2000s and was intended for a pair of .40-size four-stroke engines. That sounded really awesome in theory—until I realized that it was going to cost me nearly $500 to $600 to source said engines for this plane. That realization quickly helped me decide that an electric conversion was going to be the best option for this plane. Or at least I thought.

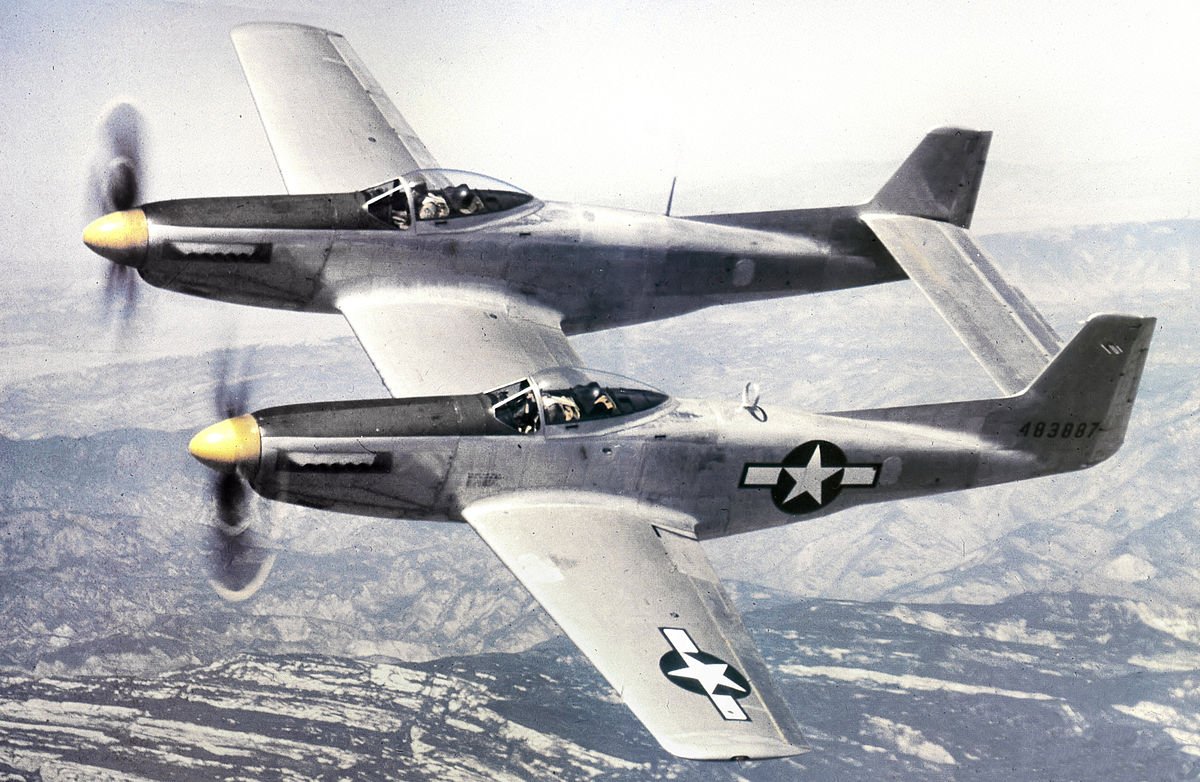
A Brief History of the P-82
The P-82, or F-82 depending on the year, is a very unique airplane that was built for the specific purpose of long-range bomber escort for bombers such as the B-29 Superfortress. With two fully functioning cockpits, one on each side, two pilots could trade off flying longer missions. It later found roles as an interceptor and even played a pretty crucial role in the Korean War.
Unlike conventional twin-engine planes, the use of two fuselages made this airplane incredibly unique—but also made for a surprising number of issues when converting it into an RC flying model.
Initial Assembly and Design Challenges
After taking everything out of the box for the first time and starting the initial assembly of this plane, it was evident that this was not going to be an easy build—especially when looking to convert it to electric power. Double fuselages essentially meant double the work, and with no central fuselage to act as a hub for electronics, batteries, and radio equipment, issues with the design quickly became clear.
Soon, I had a to-do list of problems that I was going to need to solve to ensure this plane would not only fly but also be able to be transported without having to disassemble the entire airframe.
Problem #1: Wing Assembly and Transportation Concerns
With the instructions calling for the three-piece wing to be epoxied together into one piece, it raised a few concerns. One being that the center portion of the wing acts as a passage for all of the servo wires to run from one side of the fuselage to the other. Having to remove the entire wing for transport meant unplugging a rat’s nest of wiring every time it is brought to and from the field.
The other concern was that without the wing attached, nothing would hold the two fuselage halves together except the horizontal stabilizer, which would be prone to breaking if the fuselage halves were moved around too much without the wing holding them together. I was quickly realizing that field assembly time would be a nightmare if I followed the instructions.
Instead, I decided to make the outer wing panels removable, so the center section of the wing could remain attached for transport—making transport much easier and less prone to damage, as well as reducing field assembly time.
To make these outer panels removable, I epoxied the two wing joiners into the outer wing panels. I then drilled holes and epoxied in ½” rare earth magnets into the outer panels and center section. With the addition of some shims to the wing joiners, the outer panels fit snugly into position, where they snapped into place firmly by the magnets. For extra measure, I used screws on the bottom side of the wing that secured the wing joiners to the center section of the wing.


Installing THE Electronics
With problem #1 out of the way, it was time to get some electronics installed. Throughout this plane, I used 6 Hitec HS-425BB Standard Servos—enough to get the job done reliably without breaking the bank. One side of the fuselage got two servos for the rudder and elevator, while the other side only needed one for the rudder. One servo was installed for each aileron in the outer wing panels, and finally, one last servo for the flap in the center wing section.
While assembling the airframe itself, I began to despise the included hardware that came with this plane. Not only did half of it not match what was shown in the instructions, the quality was extremely poor. This especially became apparent when attempting to install the included mechanical retracts.
I have never had the best luck with mechanical retracts in the past, and these ones proved no different. Along with the six standard Hitec servos, I also picked up an HS-75BB low profile retract servo that would be installed in the center wing section. After installing the servo into position, I ran into another issue. The servo—even though it is low profile—sat too high and would stick through the top of the wing. Obviously, a no-go.
The solution? Electric retracts. With some modification, I was able to use parts of the mechanical retracts and some new Dynam electric retract bases to Frankenstein some new landing gear for this plane.
The Electric Conversion
The final step was the big one that I was kind of dreading at this point—how was I going to actually convert this plane to electric power? No motor mounts, no access hatches for batteries, and not a single forum to reference for help. So here we go.
The first step was to mount the motors. I decided to power this plane with a twin 4S LiPo setup. For motors, I selected a pair of Hobbywing Skywalker 2826SL Brushless Motors paired with some 80A Skywalker ESCs. These would be powered by a pair of 4S 4000mAh LiPo packs.
For the motor mounts, I built some custom standoffs with long machine screws and thick-walled aluminum tubing. By using washers as spacers, I was able to get the position and thrust angle just right for each side. With the motors installed, I was feeling pretty good—but the bigger problem was going to be finding a way to add the 4S LiPo battery packs to each fuselage without having to take the wing off.
My solution was to use one of the cutouts on the inside wall of each fuselage to create a custom access hatch. Using a hobby knife to cut the covering away, I used it as a template to create a hatch, which I cut out of some ⅛” balsa. I then used the same piece of covering to iron onto the new hatch cover. Some old servo arms I had lying around made perfect use for a custom latch mechanism that worked incredibly well.
With the ability to access the inside of the plane through the new hatches, the last major step was to figure out where and how to mount these 4S battery packs in a way that worked best with the center of gravity of this plane.
The best solution I found was to use the spot that would have been used for fuel tanks if I had gone the nitro engine route. After taking some measurements and whipping up a custom battery tray in Fusion 360, I printed out these new battery trays with my 3D printer. With the help of some Velcro, these battery packs finally had a home.


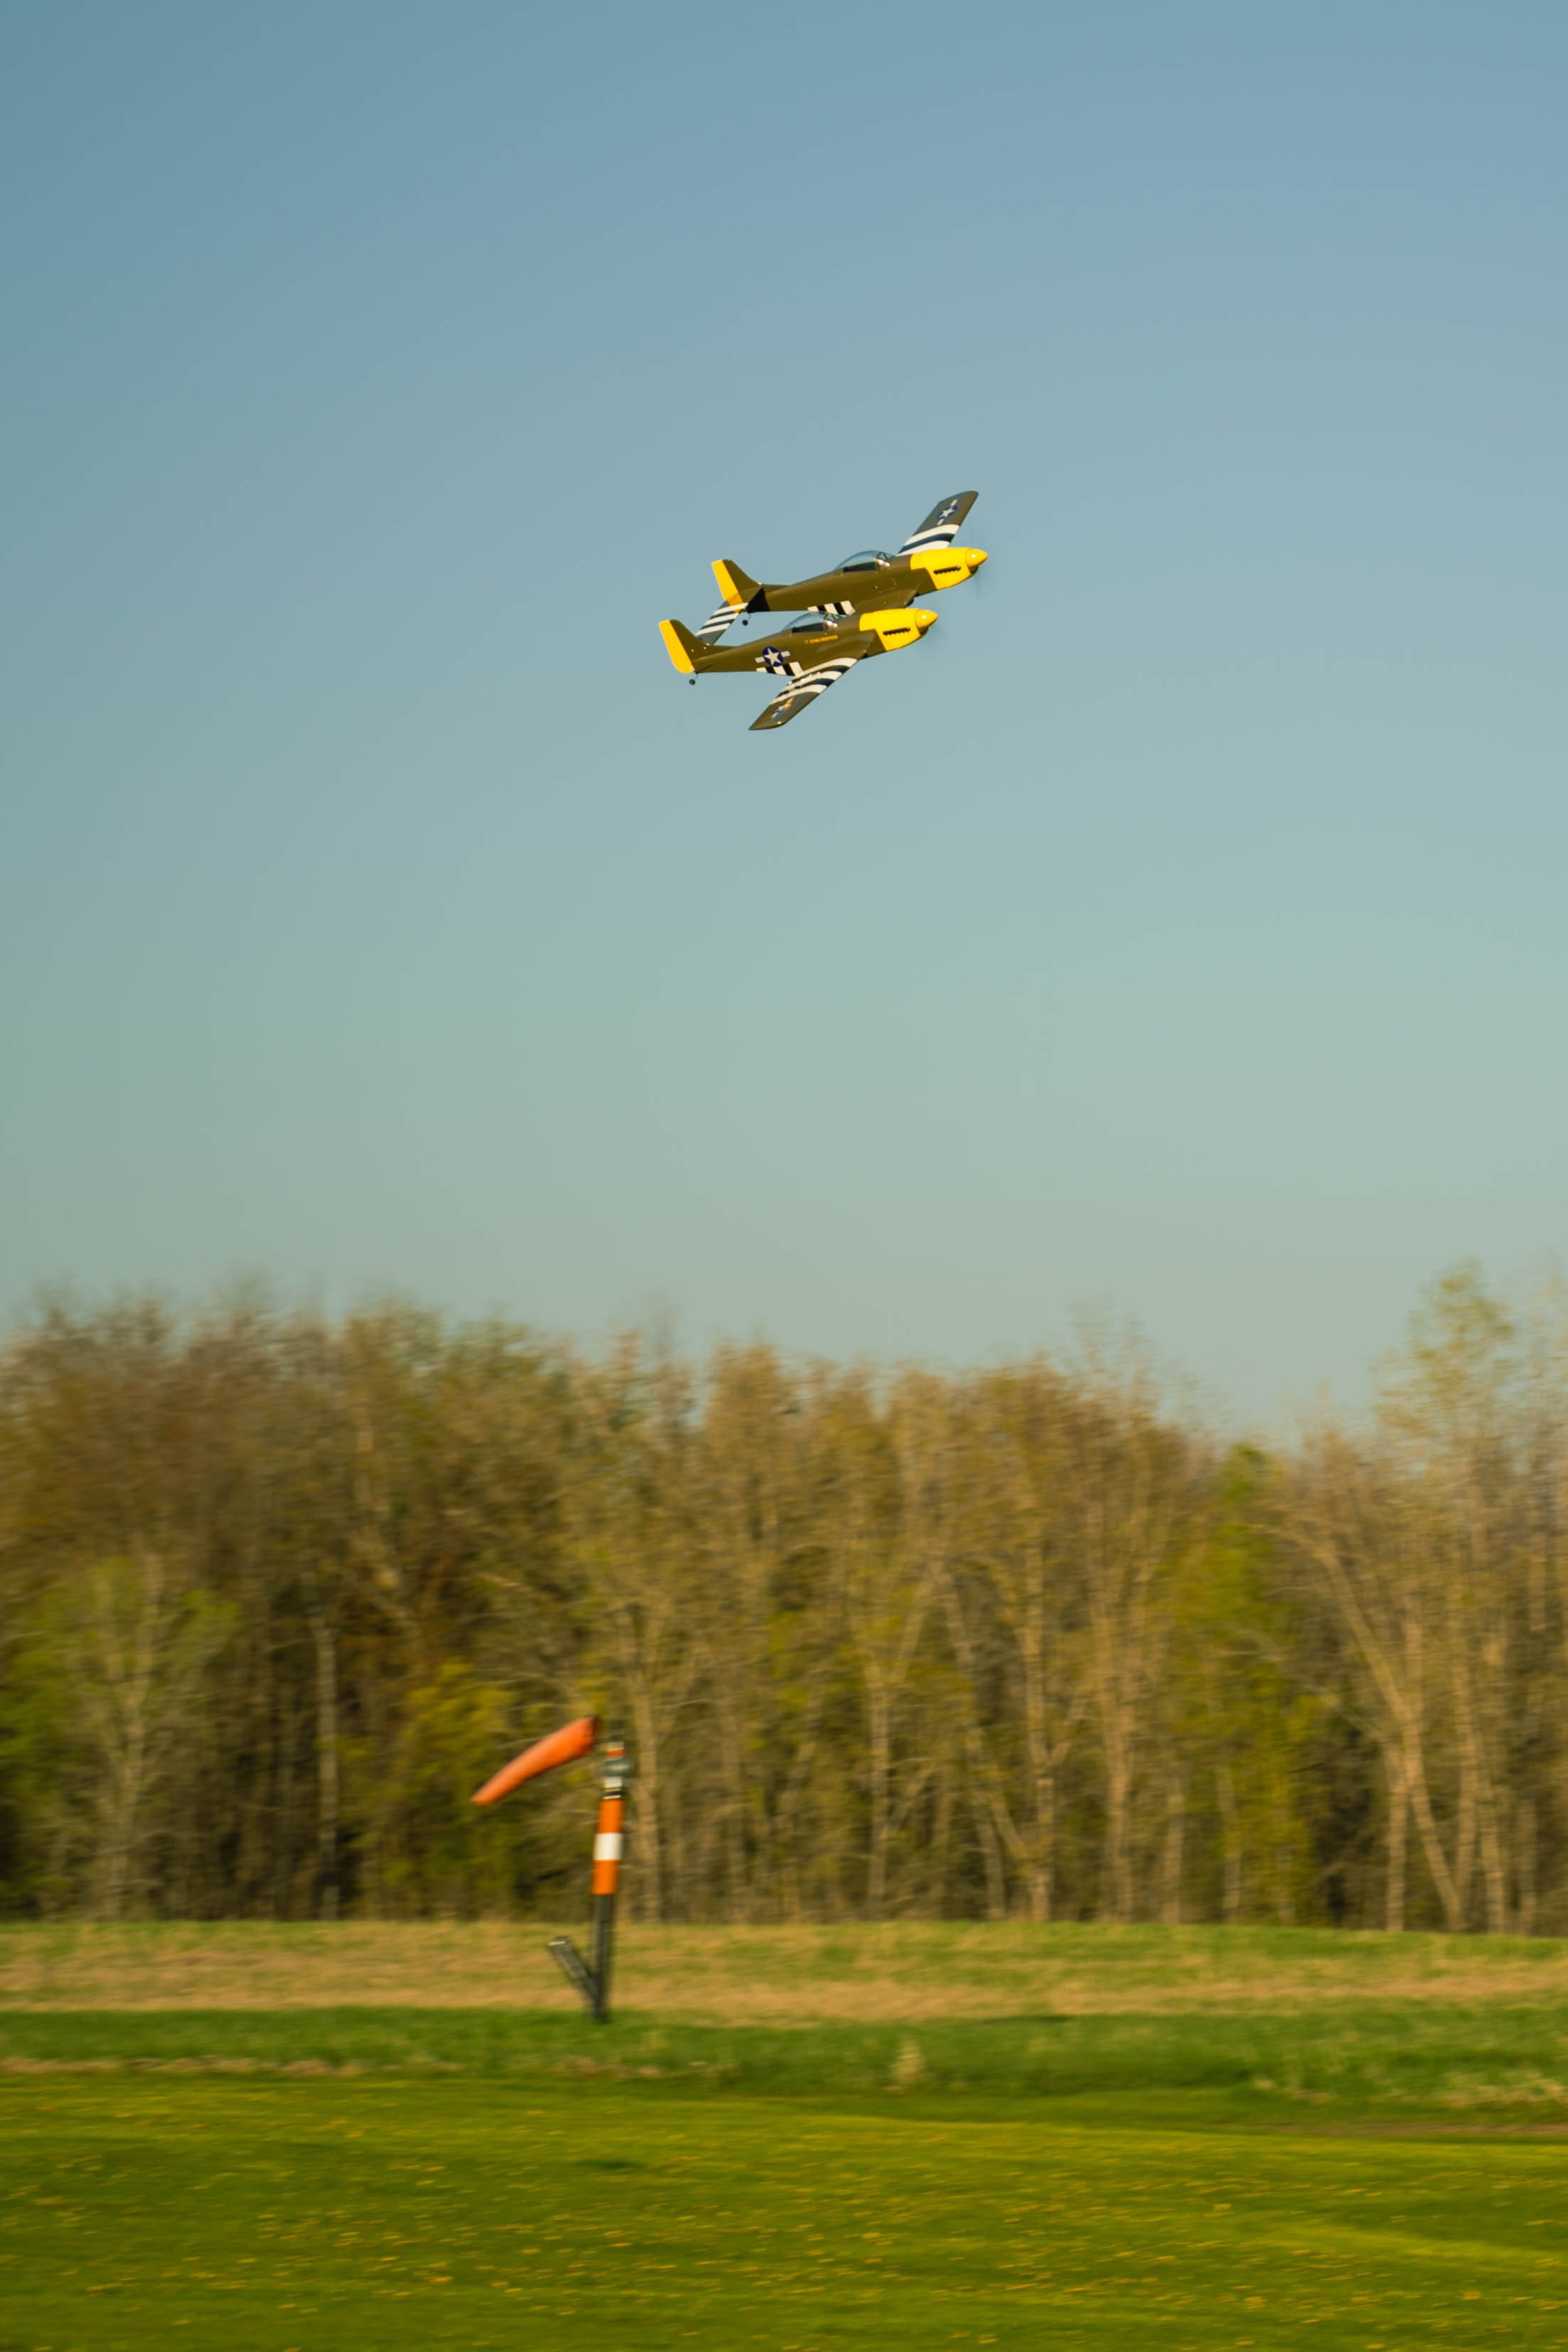
The Maiden Flight
What felt like a never-ending engineering capstone project was finally complete and in one working piece on my workbench. All in all, this project took me 5 months to complete, and it was finally ready for its maiden flight.
I’ve been flying RC planes for a long time, and I honestly couldn’t remember the last time I had the nerves hit me a bit for a maiden flight. But this one definitely did it. With all of the time, money, and investment from the fans on my social media accounts—I was without a doubt a little nervous about this one.
The amount of customization and modifications that have been done to this plane were going to be put to the ultimate test. And all I could do was triple-check everything and cross my fingers. With the batteries loaded in and everything looked over one last time, it was finally time to get this bird in the air.
A slow run-up of the throttle—the twin motors yanked this plane into the air. Seriously, I could not believe how short the takeoff roll was. But there it was—IN THE AIR! And I honestly could not believe how well it was flying. A few clicks of trim were all that was needed, and it felt right at home cruising through the sky.
After making sure everything was going to be alright, I brought this beauty in for some photo passes, celebratory rolls, and high-speed passes. And after about 5 minutes or so, it was time to drop the retracts and bring it in for a landing.


Final Thoughts
This has been one of my biggest and most challenging RC projects to date, but I couldn’t be more happy with how everything turned out. I feel like I’ve learned so much, and the result of seeing this thing in the air for the first time—flying as good as it did—was a priceless payment.
Make sure to check out the full build series of this P-82 Twin Mustang on my socials!
YouTube - https://www.youtube.com/@Hangar14RC
Instagram - https://www.instagram.com/hangar14rc/
TikTok - https://www.tiktok.com/@hangar14rc
Full Parts List
2x Hobbywing Skywalker 2826 SL Brushless Outrunner Motors (850kV)
Miscellaneous Hardware